General information
Members of TUC use these devices for printing, copying, and scanning to USB drives or e-mail addresses. It works only with enough credit on their papercut accounts. Employees can use their service accounts through the TUC. If there is no credit on the Papercut account, please transfer some money to your account. For more information please look here.
Library users have to do nothing before they use these devices. The billing of prints, scans, or copies will be made over the library account. Library users can pay it cash before leaving the library during our opening hours with library staff.
Prices are put up on each multifunctional device. You can find the price list here, too:
Charges for printing, copying, and scanning
If you print from our PCs you can only print to the online queue „FindMe“. After this, you have to go and register at one of our multifunctional devices. There you see your print jobs for release. Please release all of your print jobs our use „Druckfreigabe“ (single job release) to release job by job.
Log on / Log off at these multifunctional devices
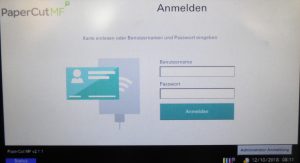
Please hold your library card/student ID card to the RFID field left next to the touch display. You can also log in manually via the touch display. Tap into the line Benutzername and Passwort.
Also, you can log in after following schemes:
members of TUC: username + password
library user: user number + library password (ddmmyy)
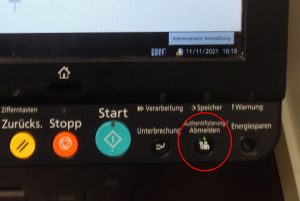
If your work is done, don’t forget to log out. Please use the key „Authentifizierung/Abmelden“ on the control panel.
This is the start screen for all use cases after logging on, which you see in the control panel.
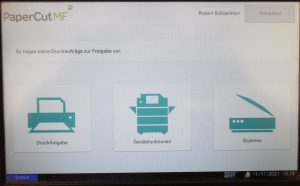
Druckfreigabe (print job release)
Gerätefunktionen (copy)
Scannen (scan to e-mail address, simple functions) – not shown to only-library-user
For more features/functions, please use the „Home“ key on the control panel.

Here you have the following functions/features.
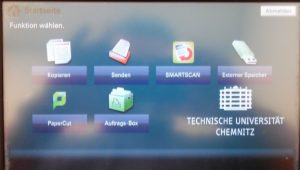
- Kopieren = copy
- Senden = scan to an e-mail address with many additional adjustments
- SmartScan = scan to an e-mail address, scan to your e-mail address, send to a fax number
- Externer Speicher = scan to / print from your USB stick
- PaperCut and Auftrags-Box = not in use
Copy
You log on to the device. When you see the menu as seen in the third picture above, tap on „Gerätefunktionen“ on the control panel. You linked to the copy function with its adjustments.
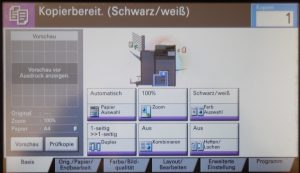
On this screen, there are the basic settings for a copy. Standard is the copy to black and white, and to copy in automatic choose of paper size. You can change to colour copies or automatically colour function. Here you can set the zoom factor, one or two-sided copies. Also, you can set to use DIN A3 paper for your copies, if you need it.
If you put your sheets at the original table on the top of the device, they get automatically copied. If sheets are 2-sided, it’s possible to copy 2-sided, too. Please set up this feature (Duplex). You don’t have to put on each sheet on the glass platen, in this case. Otherwise, you can put your sheets on the glass platen.
To start copy press the „Start“ key on the control panel.
If you want to reset the options, use the yellow key „Zurücks.“ on the keyboard. All settings will be deleted.Use the „Stopp“ key to stop all processes.

When you want to use more/other settings for copy, please use tabs on the control panel. You find these functions in the tabs.
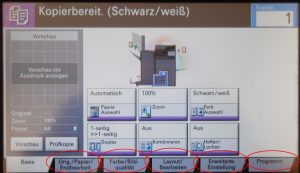
- „Orig./Papier/Endbearbeitung“ = features for the size of your original sheet, and the size of your copies. Here you can find the function to use a fixed format for your original sheets. You can use standardized formats or free formats, too. You can set also free-handed formats, if your original sheet has a special format, or the size of your sheet will be misinterpreted by the device.
- „Farbe/Bildqualität“ = colour picture quality settings like adjustments e. g. brightness, contrasts for the prints/copies.
- „Layout/Bearbeiten“ = layout sheet adjustments, e. g. Options to copy brochures and flyers
- „Erweiterte Einstellung“ = „advanced options“ e. g. multiple copies, rotation of the copy, flipped copies
- „Programm“ = programs, special options for eco mode for copies, newspaper copies
When you are finished with your copy jobs you get back via the „Home“-key to the main menu. Or log off with the key „Authentifizeriung/Abmeldung“ right down on the control panel.
Scan (to USB stick, pen drive
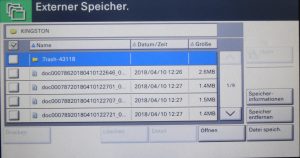
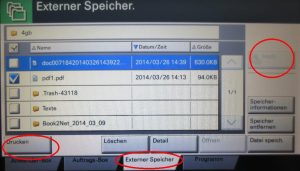
You find the USB port on the right side behind the control panel. You log on like described above, use „Gerätefunktionen“ and press the „home“ key on the control panel. Plug in your USB stick/pen drive. Now, chose the funtion „Externer Speicher“.
You see now the folders and files in your USB memory. Navigate with „öffnen“ (open) and „hoch“ (folder up) via the control panel through your USB stick/pen drive. If you are in the correct folder tap on „Datei speich.“ (save a file).
You get a basic menu for scans. Here you set different options, like brightness or resolution. At „Funktionen“ (features) there are other options like setting the file type, and the file name. Here you find also the possibility to see and change the compression of the files, which you want to scan.
Scanning of two-sided sheets works from the original table at the top of the multifunctional device, and from the glass platen, too.
The standard file name will consist of information about the day and time when you were scanning.
To start the scan press the blue-green „Start“ key.
If you are ready or want to go back to your folders of the USB stick, press „Zurück zu Liste“. If you want to remove your stick use „Speicher entfernen“ for a safe removal. Please don’t forget to log off.
Scan to email address – „2-Me“ / „Email“ – via „Smartscan“
Here you can scan comfortably to your e-mail address or another e-mail address. You can send pdf files, tiff files, XPS files, or jpegs. If you send a PDF you can use the OCR function for your scans. You log on to the device.
When you see the menu as seen in picture three, tap on „Gerätefunktionen“ at the control panel and press the home“ key. Now, use SMART SCAN.
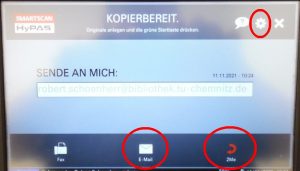
When you tap on „2-Me“ you scan to the e-mail address of TUC. Library users have to write their e-mail address in the empty field. If you use only „E-Mail“ then you have to write the e-mail address and press into the empty line on the control panel.
To set different options, e. g. change the file type, and other options please tap on the cogwheel symbol right above on the control panel.
Here you can set different options. You can set the sizes from your original if the recognition fails/makes a problem. You can change the resolution of the scans. You can change the compression of the files from a low to a high compression, and brightness of your scans. Also, you can change the language of OCR, or put OCR off.
You have to save it. If you have settings, which do not get combined you get information. Tap on „Weiter“ to see more settings. Please save your settings with „Speichern“.
When you combine settings, which are not able to combine, you can’t save this combination.
Please be informed, too big sized files couldn’t be delivered to your e-mail address. If you want to scan many sheets or scan a long article, part it into separate jobs.
To start the scan, press the „Start“ key. You can scan sheet for sheet or page by page, press for each page the start key. When you are ready press „Beenden und Senden“ to send your scans. It can take a short moment. If the transmission is successful, you get back to the start screen of the feature „E-Mail“.
Use „Abbrechen“ to stop and delete the scan job.
Go back via the „Home“ key when you have to do more on the device. If you are finished your work, don’t forget to log off.
Printing from a PC / USB stick
Our multifunctional devices are useable like a normal colour printer. If you print from a PC use the queue „Find Me“. Here you can walk to the device, register on it, and release your print job. If you want to print your jobs directly via USB stick/pen drive please note, that only the following file types are supported in this case.
pdf / .tiff / .jpeg / .XPS / .OpenXPS
You log on to the device. When you see the menu start screen, tap on Gerätefunktionen“ at the control panel and press the „home“ key. Plug your USB stick/pen drive onto the device, then press „Externer Speicher“ on the control panel. You find the USB slot on the right side near the control panel.
You see now the folders and files on your USB memory. Navigate with „öffnen“ (open) and „hoch“ (folder up) via the control panel through your USB stick/pen drive. Mark the file you want to print, and tap on „Drucken“ (printing).
Now you see the following menu on the control panel. Here you set features like two-sided
printing, change the paper cassette, if it’s necessary. Other features you can find behind the tabs „Funktionen“ and „Farbe/Bildqualität“.
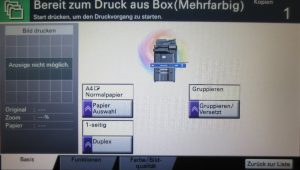
To start the printing press the „Start“ key on the control panel. If you want to reset your settings press the yellow „Zurücks.“ key. Tap on „Zurück zur Liste“ in the control panel to get back to your USB stick/pen drive. You can print the next file.
When you are ready tap to „Speicher entfernen“ (remove). After the information, that you can remove your USB stick/pen drive, you remove it and log off.